How To Optimize Your Images For WordPress
Speed makes a lot of impact on any website. Saying that you don’t want to miss tricks on how to optimize your images for WordPress. It’s proven that having a speedy website will enhance the user experience, resulting in business growth. You might already be aware that speed is one of the Google ranking factors.
It’s quite common for most of the new folks to upload the raw images directly to their website. Resulting in drastically slowing down the website. And it’s too late when they realize it, and moreover if one has multiple articles with images, it gets hard to go back and reoptimize and upload those. Lots of work, isn’t it?
No worries, if you are new this article will help you optimize your images before uploading it and let your website load faster. I will walk you through, both “the manual approach” as well as the “automatic” one through a WordPress plugin.
Let’s hop in and see how you can make image optimization better for the web performance.
What is Image Optimization
If you are clueless, what image optimization at all? Well, it’s the process of reducing the file size of images without reducing the image quality at all. In simple words, the lesser-sized image files will load faster on the website. The process is crucial to follow for overall web performance.
Benefits of Image Optimization
You will find several benefits if you optimize your images properly. Although, let me walk you through a few key benefits you will find.
- Less use of resources, save money
- Faster Backups
- Better User experience (UX)
- High page views
- Higher conversions and sales
- Improve your rankings on search engines
Undoubtedly, images make the website heavier than videos. So optimizing the images on your site will certainly improve the overall website statistics. Be rankings, pageviews, and sales. So image optimization is a must-do, for any business website for the long run.
Time to concentrate on the website speed to grow your rankings as along with Google, other search engines also consider user experience as one of the biggest factors in rankings.
How Images Slow Down a Website
There are several reasons why and how heavy images slow down the website to load. Let me break this down into a few points.
The three main reasons why images can slow sow your WordPress site are and how to get over it.
- If you are using too large images – Certainly, too large images increase the page size and will slow the website.
- If you are using too many images – Every image request makes HTTP requests and when a page makes multiple HTTP requests, it results in a slow page. However, in this case, incorporating a content delivery network (CDN) will make sense.
- Images contribute to a synchronous loading of elements, with HTML, CSS, and JavaScript and increase page render time. Altogether makes a lot of impact in loading a page or website. Solution: The alternate way is to let the images display through the lazy loading technique. That means instead of loading the images all together at once, the image could load one by one as the user scrolls down. This technique helps the slow pages with heavy images to load faster which is obviously better from a UX and SEO perspective.
To make the site faster you should get rid of such things and monitor and maintain the site wisely.
Manual Ways: Optimize Images Before Uploading to WordPress
Since now you know the important of image optimization of your website. Let’s hop into and see what are the manual ways to optimize the images to keep it lighter loading wise.
1. Choose Right Image File Formats
Now you know the image file formats has also a lot to do with the file size of the image. For instance, if the same image saved in multiple formats like jpg, png or WebP will result different file size. Yes it does.
Now, you might be wondering which image format to use to keep the page size smaller and help to its best in compression. Dramatically the answer could not be specific to particular format. Let me describe the scenarios when you can use a particular format according your type of content.
JPG (Joint Photographic Expert Group)
This is the most commonly use file format around the globe. Most of the folks like photographers or even bloggers use this format for their content. Because this format is quite Lossy and using compression technique could bring the file size down a lot. Probably that’s why its quite popular since it uses millions of colors and suitable for photographs. The down side is if the compression is not done properly, you will loose the image quality.
PNG (Portable Network Graphics)
It’s one of my favorite, according to my content of course. Since I use a lot of vectors graphics, illustrations and icons being a web designer. It is lossless image format. That means after compression the image (.png format), you might not find drastic changes to the file size. You might be thinking, then why should one use PNG’s. That’s because it lets you keep a transparent background which are used in plenty of scenarios, text, logos, icons and vectors where you don’t need the background.
WebP (Web Picture)
Comparatively to jpg and PNG, WebP is extremely new image format. In fact this image format is getting too popular, since it brings a lot of different in the file size without loosing the image quality at all. Although, since its quite new so probably still few browsers might not support it apart from the popular browsers. By the way so far till 2021, 94% of the browsers supports webP and being introduced by google. Google claims, it will reduce 34% of file size compared to jpg and 26% smaller than PNG image format. Both lossy and lossless are allowed by WebP image format.
Are you in a dilemma which image format you should go with. Well, it depends on the requirements. You can use multiple format on your web page in different scenario. But certainly future is WebP as it helps to minimize the image sizes dramatically once you convert other formats into it.
2. Use Correct Image Size
You need to deliver the scaled images in order to further optimize your images in WordPress. You might be thinking, what would be the correct image size file for your content or blog layout. And how can you determine it.
Its one of the important point to consider and rescale your images according to your content width. Because, if you place bigger resolution image in the smaller layout, then while loading the same image by the user the browsers need to scale the image to display pixel perfect. Which certainly takes extra time to loading, resulting slow loading page.
There are several image resizing tools available both online and offline. These can be use to resize the images before uploading to WordPress.
- Online tools – Reduce images
- Offline tools – Adobe photoshop, GIMP etc.
I generally use photoshop, the process is simple.
Open the photo in photoshop. Press Ctrl+Shift+I from your keyboard. Image size dialog box will pop-up.

Input width parameters according to the requirement. The height of the image will also proportionately.
Resizing is crucial, if we are in the process of optimizing the images before uploading. There are several other things to do as well to keep the website lighter and optimal.
3. Compression Your Images
The process followed to minimize the size of an image file, whether it could be the resolution or pixels without effecting the quality is called image compression.
optimized images goes 40% lighter than the unoptimized images. doesn’t matter before or after uploading, image compression needs to be done compulsory to make the website load faster and optimal.
Now, its completely depends which kind of compressions you would like to go with loosy or Lossless as explained on JPG’s and PNG’s.
4. Think About the Featured Image
WordPress posts don’t contain featured images, but the images are used structurally throughout your theme. When viewing a particular post, for instance, it may appear as a thumbnail next to the title.
You can’t afford to ignore optimizing the featured images because many themes and widgets rely on them. Although, featured images looks good and it is possible to use featured images to set custom header images on specific posts and pages or to display thumbnails. But, it impacts slowing down your website to some extent.
Decide the size of your featured image once according to your layout, and this size will apply to all future featured images. I prefer not to display the featured image for single posts for few of my blogs, which helps loading a bit faster.
5. Apply Lazy Load Images
Typically whenever you visit a web page, all the content along with the images will get started loading. And that would certainly, takes time. Moreover if you have a heavy page with tons of image, that might look like a disaster.
This is where lazy loading images feature will be the ultimate rescue. activating this feature will let the images to load one by one, only if the user scrolls down.
6. Cache Images
At most every website follows this process of caching images for their website. The process helps the end user to load the website or web page faster since the images get saved with the help of browsers in local or a near by server.
The process can be followed through copy or installing any one of the popular caching plugins or any image compression plugin like WP Smush.
7. Need to Avoid Image URL Redirects
Another factor that may cause a slowed down page is the redirects created by your images. Redirects usually occur when images link to other places.
Embedding images from outside sources onto your website is not recommended. As a replacement, save each image and media piece directly to your site. Make sure your images do not link out to anything, such as a separate media page.
8. EXIF Data Need to be Removed
An image’s EXIF data contains information about the location and method of taking the photo. For web files, it isn’t usually necessary since it is automatically added by cameras.
Thus, eliminating this data from your images could improve the performance of your pages, although it will not have a major impact. There are a few plugins available in the WordPress repository that might help you get rid of it. It’s recommended if you use a lot of photographs on your website.
9. Content Delivery Network (CDN)
Although, it’s not at optimization technique, but definitely would help your site load faster to the users. When we have a group of servers located in several areas around the globe and the content can be delivered from the closer location to the users, is referred as Content deliver network (CDN).
Using CDN is one of the faster way to serve the users with the content as fast as possible. There are several CDN services available in the market FREE and Paid both.
How to Optimize Your Website with Image Compression Plugin – Automated Way
Since you have already seen the process of optimizing the images through manual ways. It can be understood it’s time consuming and not feasible for content marketers and bloggers or even business websites.
Let me walk you through a solution, to automatically compress and optimize all the images as per requirement. Simple settings will do the job.

- Install the plugin Smush Pro , click on this discounted link to get 20% OFF on WPMU Dev membership. Free version is also available with limited features.
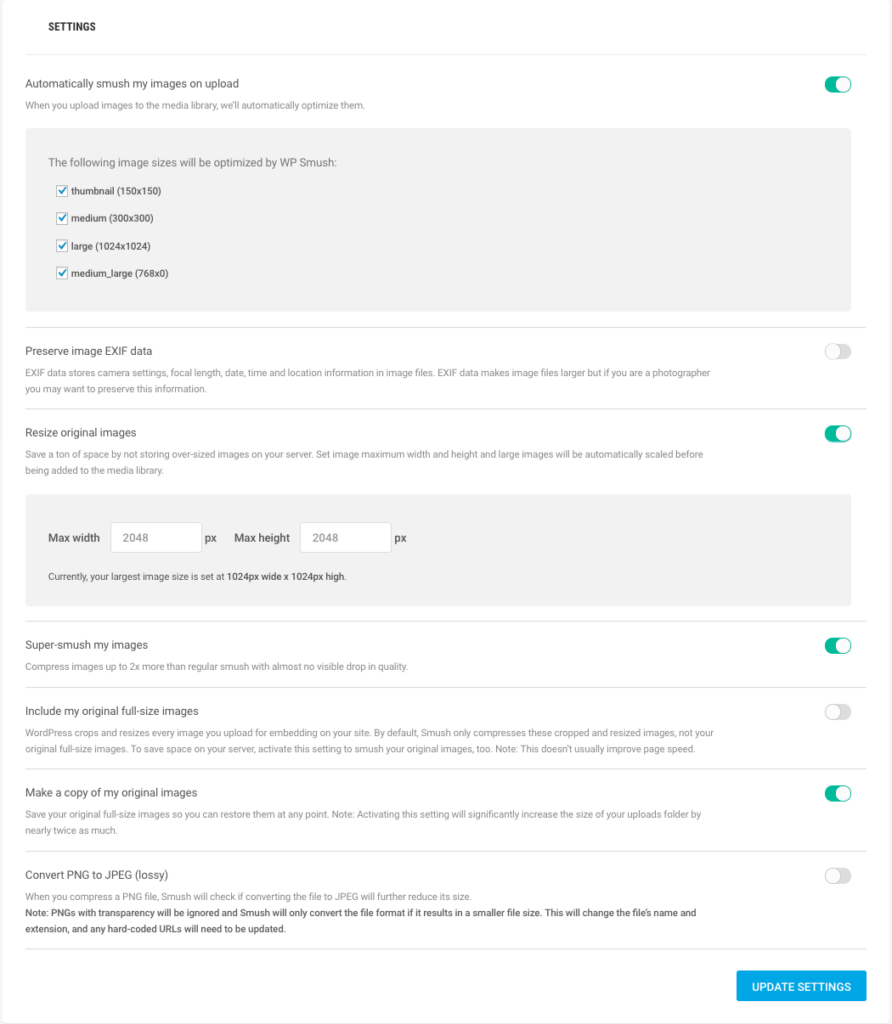
Here are some recommended settings you can make in Smush pro. This will make your site lighter and faster within few minutes.
And fortunately you have bulk Smush option too along with Smushing individual images. This will save lot of your time. But you need to be mindful with the settings.
Here are the stats of image compression done for only few images.
with 46 images it made the site 2.44MB light which is 17.33%. Assume if you have thousands of images and the plugin optimizes all.

How To Test Your WordPress Site Speed
You can test the website in many ways. Yes, there are several automated tools available online which will not only let your test your website speed and mention grades, but also let your fix those.

I do use GTMetrix and Pingdom quite usually to check the website speed and fix the errors by follow the recommendations. You can do it as well.

GTMetrix, doen’st show any suggestion on the below categories after running the plugin and optimize the images.
- Properly size images
- Avoid multiple page redirects
- Serve images in nex-gen formats
The plugin is worthy and saves a lot of time if you don’t want to do things manually.