No wonder; site speed is always considered an important aspect of business growth. A fast-loading website tends to bring more visitors and ROI. Fortunately, having a fast website is no longer rocket science at all when we have a caching plugin like Hummingbird.
This plugin has the capability of speeding up your website in no time. In this article, I am going to review the Hummingbird Pro plugin and see how to install and do the settings part step by step.
What is Hummingbird
Hummingbird has been developed by WPMU Dev, the same team that created Smush image optimization, now featured on more than 1 million websites. Hummingbird and Smush provide complete speed improvements.
The Hummingbird framework increases site speed and performance by adding new controls over file compression, deferring styles and scripts, minifying CSS and JavaScript, implementing lazy loading, and performing world-class caching.

Why You Need to have a Faster website
Your site’s page loading times have an impact on nearly every aspect of its performance, including search engine optimization. Visitors will leave your site if its pages lag, for instance. Most mobile users expect their connection to be fast because they are on the go.
Furthermore, search engines will rank pages based on how fast they are. It is essential to optimize your organic search results, as almost two-thirds of organic search traffic comes from the top three search results. Accordingly, the higher your site appears in search results, the more likely it is to be seen and clicked on.
Here is the result of a website,

Overview of Hummingbird Pro Features
All the features in Hummingbird are meaningful and the interface looks clean and tidy. All the optimization features are worthy and can make any website load faster than ever before. Let me walk you through them.

- Dashboard – Towards the very top of your dashboard, you will find the results of your latest performance tests, letting you know quickly if the site is running within acceptable limits.
- Performance Test – Hummingbird runs a scan of your site to assess its speed and efficiency, and then produces a report that outlines ways to fix problems and improve performance.
- Caching – Cached pages, browsers, and gravatars must be enabled and configured.
- Image Optimization – In combination with Smush, Hummingbird makes images on your page load faster, thereby improving overall page speed.
- Gzip compression – The Gzip compression algorithm reduces the size of server files so that they are faster to be sent to browsers.
- Asset Optimization – Page optimization improves page speed by enhancing the efficiency and performance of your code and assets.
- Advanced Tools – You will be able to find some advanced options that will help you load the website load much faster.
- Uptime – When your site goes down, Hummingbird Pro will notify you via email and let you know the moment your website is up and running again.
- Reports – A feature of Hummingbird Pro that will help you stay on top of potential performance issues is the automated and scheduled sending of Daily, Weekly, and Monthly Performance Tests, Database Cleanup, and Uptime reports.
Speedup Your Website with Hummingbird Pro
Hummingbird Pro comes with robust features to speed up your website quickly. Most of the required settings of the plugin come by default. Although, there are a few advanced features that let you tweak for further optimizations.
Let’s see the Hummingbird Pro plugin in action,
Install the Plugin
Now installing a WordPress plugin is not rocket science, there are a few ways to do that. Both the free version (Hummingbird Performance) and the pro version of Hummingbird are available. We are using the Pro version in this article. Some features are restricted in the Hummingbird free version.
- Install Free version – wp-admin > plugins > add new and look for Hummingbird in the search area.
- Install Pro Version – WPMU Dev has developed an ultimate site management area and called it SiteHub. Here you can access and manage all the updates and install, the plugins and themes from one destination. It makes the job easier.
Step 1 – Run the Performance Test
After activating the Hummingbird Pro plugin, you should run the test (click on the Run Performance Test button) to see what are all the possibilities of the optimization.
Navigate, wp-admin > Hummingbird > Dashboard > Click on Run Test Button.

It will quickly run the test and show you some data, where the optimization can be done to make the website lighter and faster.

Step 2: Configure Caching
The next step is to activate the Caching feature. To do so, Navigate, to Hummingbird Pro > Caching > Click on Activate button.
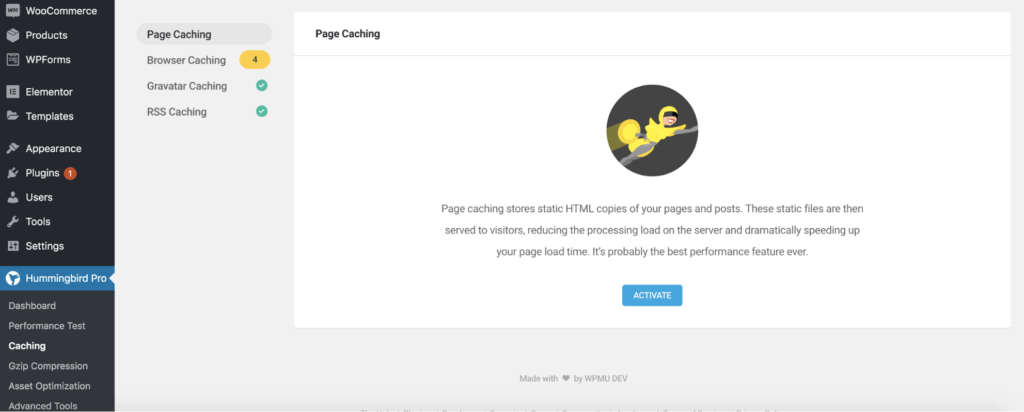
As soon as you activate caching, you will be able to see all the caching features there, and the plugin will start working on optimizing it.
- Page Caching
- Browser Caching
- Gravatar Caching
- RSS Caching and
- Settings (of cache)

Although, by default, all the options will be selected you can always change caching options.
Your WordPress back end includes a Caching tab which allows you to enable page caching, browser caching, and more.
Step 3: Gzip compression
Navigate, wp-admin > Hummingbird Pro > GZIP Compression to enable three different types, HTML, Javascript, and CSS.
For Gzip compression – your websites and style sheets are compressed before being sent to the browsers of your visitors allowing them to load faster.

Click the Apply Rules button when you have selected the type of server on which your site is hosted. After that, the plugin will do the necessary work. Manual tweaks are also possible if you wish.
There are some details to the workings of GZIP compression.
You don’t have to understand all the technical methods to use this speed optimization technique on your site, like many other speed optimization techniques.
Step 4: Minify Files
To simplify the UI, the minification feature of Hummingbird is located in the Asset Optimization tab.
Navigate wp-admin > Hummingbird > Asset Optimization
To see all the minification options you need to enable asset optimization. Once done, run the check to see, the all possible optimizations could be done to the files.
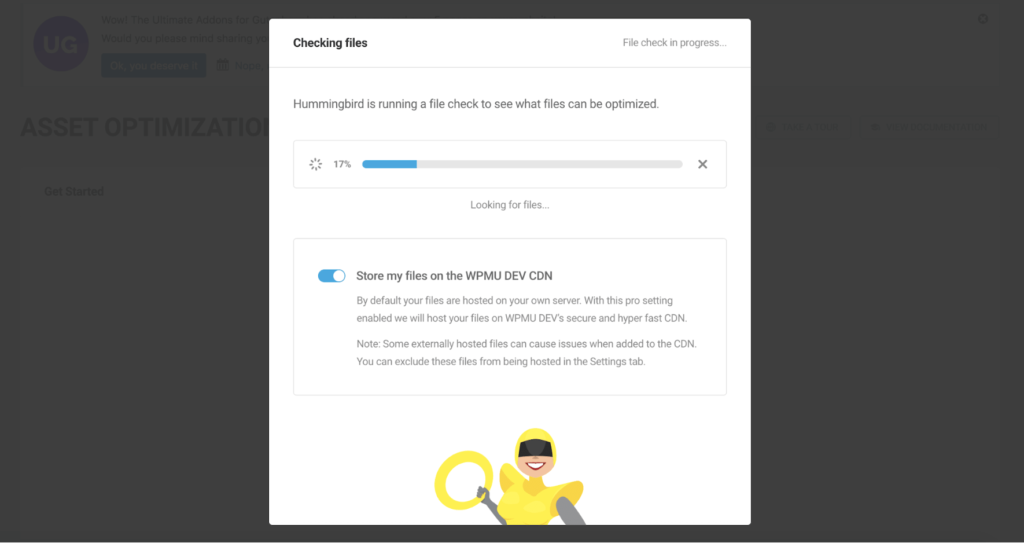
You can also switch to the WPMU Dev CDN so that all your static files can be stored in the CDN and delivered to the users from the nearest location making the website faster and enhancing the user experience.
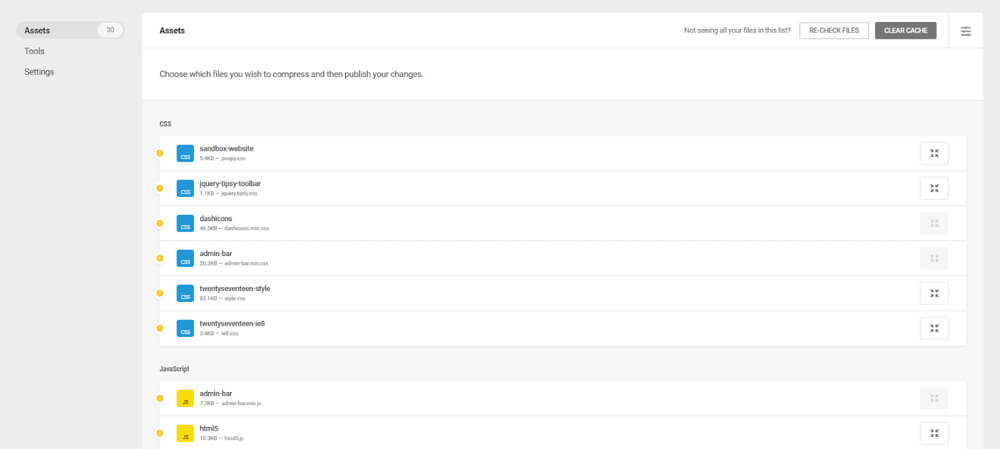
The process of minification is similar to that of GZIP compression. By eliminating unnecessary data from your code, you can help your site perform faster.
It will take you less time for your pages to load when less information needs to be sent between the server and browser.
Hummingbird Pro Pricing
When it comes to pricing WPMU Dev offers a different approach to it. There are several caching plugins in the market, and Hummingbird Pro is special for its pro features.
You need to get their membership starting at $12.67/month only. (7 days Free and you can cancel anytime)
| Plans | Sites | Plugins | CDN | Price | |
|---|---|---|---|---|---|
| Personal | 1 | 11 | 10 GB | $12.67 / mo | |
| Freelancer | 20 | 11 | 100 GB | $26 / mo | |
| Agency | Unlimited | 11 | 250 GB | $66 / mo |
Hummingbird Pro Features
- Performance report
- Complete cache suite(browser, full page, gravatar) does magic and makes faster loading
- Uptime Monitoring
- Cloudflare Cache-Control
- Gzip Compression
- Asset Optimization
- Hosted File Optimization (CDN)
- Database Optimization
- Cache Preloading
- Easy and Advanced Modes